Wednesday, May 23, 2007

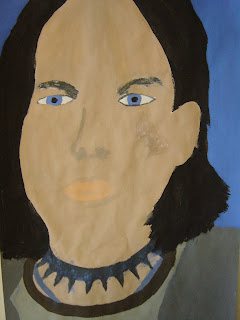
2nd Grade- David Park Summertime Paintings


Lesson Plan for
Elementary Art
Teacher: Mr. Cooper-Davis Grade: 2nd Quarter: Week:
Fine Art Standard(s)
25.A.1d
26.A.1e

Performance Descriptor(s)
Identify the elements of line, shape, space, color and texture; the principles of repetition and pattern; and the expressive qualities of mood, emotion and pictorial representation.
Identify media and tools and how to use them in a safe and responsible manner when painting, drawing and constructing.
Objectives:
· TLW identify primary and secondary colors
· TLW explain how to make more and less intense colors
· TLW demonstrate how to create sunlight with paint
· TLW create a self portrait of themselves on a bright sunny day
· TLW practice various basic art room procedures
· TLW demonstrate each art room procedure
· TLW recall the 3 art room rules

Formative Assessment
Summative Assessment


· Check students for participation (points earned)- visual
·
· Teaching Scoring Guide used in “David Park Summertime Portraits”

Student Learning Opportunities:
Strategies
Student Learning Activities
· Games/ group activities
· Visual
· Individual Experimentation/ project
· Review Procedures: “Hand does the Talking” /“Freeze/Thaw”/“Ready to Work”/ “Clean Up
Review names of artists
· Introduce the work of David Park: Slide Show- was an artist who mainly painted people in Northern California in the 1950’s. He often used very bright colors next to much darker colors. More intense colors are straight from the tube, or mixed right from the tube. We can create less intense or more dull colors by adding a colors compliment (review color wheel) Park often painted people playing outside/ at the beach/ having fun in summer time activities.
· Introduction to project: Students will be creating their second self portrait. They will create a fairly large portrait of them selves(chest neck & head – maybe some arms) involved in some sort of summertime activity. Think about making a window box (or have some cut) with your fingers- only drawing a small amount of the entire scene on our papers.
· Once students finish their drawings they may begin painting
· Demo: Using colors like David park: Show students how to create more and less intense colors- how they work when places next to each other/ colors don’t have to be actual real colors/ show how to use various colors to show light/ bright colors next to dark colors
· Days 2-3
· Remind students that they can use any color for the bright light of the sun- it just needs to be next to a very dark color.
· Students should continue painting- covering up the entire page/ students may want to use a smaller brush to work on the details, or go back and paint in some of the details that may have been covered up
· Free Drawing and coloring pages available when finished

Resources (Materials/Texts/Visuals/Technology):
Paper (81/2 X 11), TV, computer, digital images, paint, paint cart, drying rack, pencils
Misc:
“David Park Summertime Portraits”: Students will be creating portraits of themselves during a bright warm summer day. Students need to use at least 8 different colors and need to mix at least 5 of them.

4th Grade- Native American Animal Totems


Lesson Plan for

Elementary Art

Teacher: Mr. Cooper-Davis Grade: 4th Quarter: Week:

Fine Art Standard(s)

25.A.2d

26.B.2d

27.B.2


Performance Descriptor(s)

Identify and describe the elements of 2- and 3-dimensional space, figure ground, value and form; the principles of rhythm, size, proportion and composition; and the expressive qualities of symbol and story.

Demonstrate knowledge and skills to create works of visual art using problem solving, observing, designing, sketching and constructing.

Identify and describe how the arts communicate the similarities and differences among various people, places and times.

Objectives:

· TLW recall the color terms: primary, secondary, intermediate, complimentary, neutral, color wheel

· TLW recognize the difference between “western” and “non- western” art

· TLW use the internet to do research

· TLW chose 3 animal totems based on their internet research

· TLW practice various basic art room procedures

· TLW demonstrate each art room procedure

· TLW recall the 3 art room rules

· TLW correctly execute all painting procedures


Formative Assessment

Summative Assessment


· Check students for participation + daily working attitude (points earned)- visual

· Teaching Scoring Guide used in “Native American Animal Totems””


Student Learning Opportunities:

Strategies

Student Learning Activities

· Games/ group activities

· Visual

· Individual Experimentation/ Activities/ Projects

· Review Procedures : “Hand does the Talking” /“Freeze/Thaw”/“Ready to Work” / “Clean Up”/ Painting

Review color terms

· Slide Show- Students will be introduced to Native American art/ given the opportunity to compare these works with other western works of art/ also looking at art in terms of line and color/ talk about various themes in the Art Works

· Native American animal themes: Each Native American Tribe has different customs, rituals and beliefs. Most often all customs involve animals and nature/ many times animals are chosen or “reveal themselves” as spirit guides or totems. These animals share the traits, and strengths of the person they are connected to

· (Move to computer lab) Introduction to Project: Students will be researching various animal totems and will chose 3 that they feel represent themselves. They will be filling out a short worksheet to guide them in their research. They will write down each animal and list the qualities that they feel are similar to their own.

· DAY 2: Review of animal totems/ have printed out packets for last minute research in class. Students should have all 3 animals chosen.

· Introduction to the project: Students will be creating their very own Native American Totem Pole in the tradition of the Pacific Northwest Indians. It is a tradition specific to that part of the country even though all tribes have their own connections to animal spirit guides or animal totems.

· Review/ intro native American art/ Slide Show to review/ introduce styles of northwestern native American art- in terms of stylized animals from totems/ prints

· Students may begin to look through handouts and national geographic to find their animals and begin drawing their totem poles. Painting will begin once their drawings are complete.

· Day 3

· Review of animal totems/ have printed out packets for last minute research in class. Students should have all 3 animals chosen.

· Introduction to the project: Students will be creating their very own Native American Totem Pole in the tradition of the Pacific Northwest Indians. It is a tradition specific to that part of the country even though all tribes have their own connections to animal spirit guides or animal totems.

· Review/ intro native American art/ Slide Show to review/ introduce styles of northwestern native American art- in terms of stylized animals from totems/ prints

· Students may begin to look through handouts and national geographic to find their animals and begin drawing their totem poles.

· Remind students that they need to create a Formline (thick outline) after the first stage of their drawings are complete. Students will then need to choose a variety of shapes and designs to include in the insides of their animals.

· Students ready for color need to use black, and may choose no more than 3 additional colors/ they should think about coloring in the designs in a symmetrical manor.

Resources (Materials/Texts/Visuals/Technology):

pencils, paper, paint, water, cups, brushes, drying rack, towels, smocks, oil pastels, TV, Computer, digital images, thin markers

Misc:

“Native American Animal Totems””\: Students will have to pick 3 animals that represent them to include in their totems. Their animals should be large and sit on each other’s shoulders (no floating on the page). Students need to fill up the details of the totem animals by using Pacific coastal designs. Animals and designs should be symmetrical. Students will need to use between 4-5 colors (black is one required color). No more than 5 colors should be used.

5th Grade- Lino Cuts and Radial Symmetry


Lesson Plan for

Elementary Art

Teacher: Mr. Cooper-Davis Grade: 5th Quarter: Week:

Fine Art Standard(s)

25.A.1d

26.A.1e

27.B.2


Performance Descriptor(s)

Identify the elements of line, shape, space, color and texture; the principles of repetition and pattern; and the expressive qualities of mood, emotion and pictorial representation.

Identify media and tools and how to use them in a safe and responsible manner when painting, drawing and constructing.

Identify and describe how the arts communicate the similarities and differences among various people, places and times.

Objectives:

· TLW list every day examples of how printmaking is used

· TLW describe how relief print making works

· TLW identify a bench hook and linocutter

· TLW identify the two types of symmetry (linear & radial)

· TLW create 2 linocut prints

· TLW practice various basic art room procedures

· TLW demonstrate each art room procedure

· TLW recall the 3 art room rules

· TLW demonstrate safe use of tools


Formative Assessment

Summative Assessment


· Check students for participation + daily working attitude (points earned)- visual

· Teaching Scoring Guide used in “Radial Design Linocuts”


Student Learning Opportunities:

Strategies

Student Learning Activities

· Games/ group activities

· Visual

· Individual Experimentation/ Activities/ Projects

Review Procedures : “Hand does the Talking” /“Freeze/Thaw”/“Ready to Work” / “Clean Up”/

· Introduction to Printmaking: Show slides- examples of types of print making ( relief, intaglio, planographic) also slides demonstrating how the process works. How print making is used today- examples

· Demo- How relief works/ how to print: Have a large version of a relief block ready- explain how ink will only get on the areas that are raised – like a rubber stamp- Demo printing- paper goes on top of block not the other way around- show how the ink is only on the raised areas+ that the printed image is in reverse of the original.

· Introduce the 2 types of symmetry : linear and radial- students will be creating either a linear or radial design with their linocuts

· Introduce /demo the tools: Linocutter & Bench hook- Demonstrate proper technique- safe way to cut cutting hand out and cutting- always away from you- holding hand needs to ALWAYS be below and behind the cutting hand. Rules: no student is allowed out of their seat while they have a linocutter in their possession. Anyone out of their seat will receive a detention. 2 offences and they receive a Saturday detention. If they need to get out of their seat they should raise their hands and I will take the linocutter from them. They will get it back once they are in their seats. Even if someone is cut- they should remain calm and raise their hand.

· 1st print making process: Relief- Students will come up with a simple design (minimum of 20 shapes)– drawing it on their paper: using shapes- very small shapes or lines will not work.

· Students may begin creating a simple design using large thick lines and shapes- design must be simple! Think about patterns.

· If students are finished with their designs they can transfer them to their linoleum blocks. (using charcoal on back of drawing- taping down and retracing the lines/ then color in the design areas black with a pen. All other grey areas will be cut away.

· Day 2

· Students may finish/ begin creating a simple design using large thick lines and shapes- design must be simple! Think about patterns.

· DEMO: If students are finished with their designs they can transfer them to their linoleum blocks. (using charcoal on back of drawing- taping down and retracing the lines/ then color in the design areas black with a pen. All other grey areas will be cut away.

· SAFE CUTTING DEMO: remind student who have not turned in their permission slips that they will be using cardboard and glue instead of linocutters. Remind students of rules- no one out of seat while they have a linocutter at their desk. Students should always cut away from themselves- their holding hand should ALWAYS be behind cutting hand- holding the back edge of the bench hook tight against the desk. Students should ONLY be cutting the front half of their block. Make shallow cuts. If you need to work on another area, turn the block so the uncut area is on top- you can rotate it as many times as needed. MAKE SHALLOW CUTS!- show proper way to cut/ way to hold the block. Students will need to take the block down to about ½ it’s thickness for the low spots- Students NEED to remember: they are only cutting away the areas that are AROUND their designs- not the black colored in design areas.

· Assign students to sweep up floor- as students cut they should carefully whack block so shavings STAY on their table. NO wiping onto the floor. Project paper student will be in charge of wiping shavings from desks into garbage can. When students hear clean up music that means they stop working. Failure to do so will result in them not being able to use the cutters. Cutters should be placed on desks, I will pick them up & count them.

· Day 3

· Demo Printing blocks: when students reach a point where their blocks have been fully cut, it is time to print. Demo Proper way to ink and then print blocks- Students will be creating 2 finished prints of the same color- no switching color. Paper needs to be placed on top of blocks. Bench hooks will be used to press the paper down to maximize the amount of ink that the print gets. Students need to sign the front of their print (a signature not just their name). at the end of the day they can take them home- if they wish they may trade one print with someone in their class? In the event that some classes run out of time and do not get to print, I will hold special after school sessions so students may print.

Resources (Materials/Texts/Visuals/Technology):

pencils, paper, block example, printing ink, brayer, ink trays, TV, Computer, digital images, lino cutters, lino blocks, bench hooks

Misc:

“Radial Design Linocuts” Students will crate 2 prints in the same color using either a radial or linear (symmetry) design. Students need to use at least 20 shapes in their design.

Sunday, January 21, 2007

6th-8th Grade- Grid Portraits


Lesson Plan for

Elementary Art

Teacher: Mr. Cooper-Davis Grade: 6th-8th Quarter: Week:

Fine Art Standard(s)

25.A.1d

26.A.1e

Performance Descriptor(s)

Identify the elements of line, shape, space, color and texture; the principles of repetition and pattern; and the expressive qualities of mood, emotion and pictorial representation.

Identify media and tools and how to use them in a safe and responsible manner when painting, drawing and constructing.

Objectives:

· TLW demonstrate knowledge of correct facial proportions

· TLW create two complete practice drawings of the face in portrait and profile (using correct proportions)

· TLW demonstrate measuring in various inch increments

· TLW create an exact copy of a drawing using the grid system

· TLW create a self portrait contour line drawing using a 1:2 grid ratio

· TLW practice various basic art room procedures

· TLW demonstrate each art room procedure

· TLW recall the 3 art room rules

Formative Assessment

Summative Assessment

· Check students for participation + daily working attitude (points earned)- visual

· Teaching Scoring Guide used in “Self Portrait Grid Paintings”

Student Learning Opportunities:

Strategies

Student Learning Activities

· Games/ group activities

· Visual

· Individual Experimentation/ Activities/ Projects

· Review Procedures : “Hand does the Talking” /“Freeze/Thaw”/“Ready to Work” / “Clean Up”

Review Painting Procedures

· First ½ of class- finish Geometric Paintings

· Review Portraits (what is it) types?/ Portrait (front), Profile (side), ¾ view

· Proportions: what are they? Face is more or less symmetrical from left to right (what is symmetrical)/ it is also measurable

· Portrait activity: As a class, students will create their own portrait and profile views of the face. I will demonstrate step by step where facial features should be located- students will have a chance to add details to the faces after we have finished with the basic elements

· If time- introduce using a grid to create an accurate copy of a drawing

· Review using grids- all students need to be comfortable using them/ understand concept before moving on to drawing portrait.

· Introduce measuring in 1 inch increments- creating a 1 inch grid over their self portrait (draw lightly- erasing will destroy the portrait)

· Introduce measuring in 2” increments- creating a 2” grid on their project paper: Extremely important to draw lightly- makes the lines easier to erase when finished.

· Introduce creating enlargements using grids- Students may begin drawing their portraits once their grids are correct.

· Begin/ continue working on drawing their portraits- work slowly- draw only lines in 1 square at a time

· Students finished with their drawing may begin painting

· Classes painting review painting procedures/ monitor duties/ requirements during painting

Resources (Materials/Texts/Visuals/Technology):

pencils, portrait worksheets, erasers, overhead sheets, overhead pens, overhead projector, 12X18” paper, Painting Cart

Misc:

“Self Portrait Grid Paintings”: Students will be creating their second self portrait. This self portrait will be an enlargement of an original picture. Students will need to create a 1X1” grid on their pictures of themselves and a 2X2” grid on their paper. After creating the contour drawing of themselves, they will erase the grid and begin to paint their portrait.