Sunday, January 21, 2007

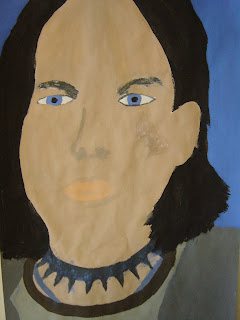
6th-8th Grade- Grid Portraits


Lesson Plan for

Elementary Art

Teacher: Mr. Cooper-Davis Grade: 6th-8th Quarter: Week:

Fine Art Standard(s)

25.A.1d

26.A.1e

Performance Descriptor(s)

Identify the elements of line, shape, space, color and texture; the principles of repetition and pattern; and the expressive qualities of mood, emotion and pictorial representation.

Identify media and tools and how to use them in a safe and responsible manner when painting, drawing and constructing.

Objectives:

· TLW demonstrate knowledge of correct facial proportions

· TLW create two complete practice drawings of the face in portrait and profile (using correct proportions)

· TLW demonstrate measuring in various inch increments

· TLW create an exact copy of a drawing using the grid system

· TLW create a self portrait contour line drawing using a 1:2 grid ratio

· TLW practice various basic art room procedures

· TLW demonstrate each art room procedure

· TLW recall the 3 art room rules

Formative Assessment

Summative Assessment

· Check students for participation + daily working attitude (points earned)- visual

· Teaching Scoring Guide used in “Self Portrait Grid Paintings”

Student Learning Opportunities:

Strategies

Student Learning Activities

· Games/ group activities

· Visual

· Individual Experimentation/ Activities/ Projects

· Review Procedures : “Hand does the Talking” /“Freeze/Thaw”/“Ready to Work” / “Clean Up”

Review Painting Procedures

· First ½ of class- finish Geometric Paintings

· Review Portraits (what is it) types?/ Portrait (front), Profile (side), ¾ view

· Proportions: what are they? Face is more or less symmetrical from left to right (what is symmetrical)/ it is also measurable

· Portrait activity: As a class, students will create their own portrait and profile views of the face. I will demonstrate step by step where facial features should be located- students will have a chance to add details to the faces after we have finished with the basic elements

· If time- introduce using a grid to create an accurate copy of a drawing

· Review using grids- all students need to be comfortable using them/ understand concept before moving on to drawing portrait.

· Introduce measuring in 1 inch increments- creating a 1 inch grid over their self portrait (draw lightly- erasing will destroy the portrait)

· Introduce measuring in 2” increments- creating a 2” grid on their project paper: Extremely important to draw lightly- makes the lines easier to erase when finished.

· Introduce creating enlargements using grids- Students may begin drawing their portraits once their grids are correct.

· Begin/ continue working on drawing their portraits- work slowly- draw only lines in 1 square at a time

· Students finished with their drawing may begin painting

· Classes painting review painting procedures/ monitor duties/ requirements during painting

Resources (Materials/Texts/Visuals/Technology):

pencils, portrait worksheets, erasers, overhead sheets, overhead pens, overhead projector, 12X18” paper, Painting Cart

Misc:

“Self Portrait Grid Paintings”: Students will be creating their second self portrait. This self portrait will be an enlargement of an original picture. Students will need to create a 1X1” grid on their pictures of themselves and a 2X2” grid on their paper. After creating the contour drawing of themselves, they will erase the grid and begin to paint their portrait.

5th Grade- Cityscapes (1 Point Perspective)


Lesson Plan for

Elementary Art

Teacher: Mr. Cooper-Davis Grade: 5th Quarter: Week:

Fine Art Standard(s)

25.A.2d

26.B.2d

Performance Descriptor(s)

Identify and describe the elements of 2- and 3-dimensional space, figure ground, value and form; the principles of rhythm, size, proportion and composition; and the expressive qualities of symbol and story.

Demonstrate knowledge and skills to create works of visual art using problem solving, observing, designing, sketching and constructing.

Objectives:

· TLW recall and demonstrate 3 ways artists create the illusion of space

· TLW create complete drawings using 1pt perspective

· TLW practice various basic art room procedures

· TLW demonstrate each art room procedure

· TLW recall the 3 art room rules

Formative Assessment

Summative Assessment

· Check students for participation + daily working attitude (points earned)- visual

Teaching Scoring Guide used in “1 Point Perspective Cityscapes”:

Student Learning Opportunities:

Strategies

Student Learning Activities

· Games/ group activities/ review

· Visuals

· Demo

· Individual Experimentation/ Project

· Review Procedures : “Hand does the Talking” /“Freeze/Thaw”/“Ready to Work”/ “Clean Up”

Review: contour lines

· Slide Show: Landscapes- how to create space/ discussion about 3 ways

· Demonstrating 3 ways of creating space/ introducing 1pt perspective

· 1pt Perspective intro drawings- boxes above, below and on horizon line

· Introduce / Start Projects (go over Scoring guides)

Resources (Materials/Texts/Visuals/Technology):

pencils, paper, rulers, straight edge, colored pencils, markers, crayons

Misc:

“1 Point Perspective Cityscapes”: Students will use 1pt perspective to create a detailed drawing of a real or completely imagined neighborhood. Students need to have at least 10 buildings or items drawn in 1 point perspective

5th Grade- Surrealist Bedrooms (1 Point Perspective)

Lesson Plan for

Elementary Art

Teacher: Mr. Cooper-Davis Grade: 5th Quarter: Week:

Fine Art Standard(s)

25.A.2d

26.A.2e

Performance Descriptor(s)

Identify and describe the elements of 2- and 3-dimensional space, figure ground, value and form; the principles of rhythm, size, proportion and composition; and the expressive qualities of symbol and story.

Describe the relationships among media, tools/technology and processes.

Objectives:

· TLW recall the vocabulary associated with 1 pt. perspective

· TLW show their knowledge of how to use 1 pt. perspective

· TLW create a finished drawing of 2 houses in 1 pt.

· TLW practice various basic art room procedures

· TLW demonstrate each art room procedure

· TLW recall the 3 art room rules

Formative Assessment

Summative Assessment

· Check students for participation + daily working attitude (points earned)- visual

Scoring Guide used in “Surrealist Bedrooms”

Student Learning Opportunities:

Strategies

Student Learning Activities

· Games/ group activities

· Pre-teaching

· Visuals

· Individual Experimentation/ Activities/ Projects

· Review Art Room Procedures : “Hand does the Talking”, “Freeze/Thaw” , “Ready to Work” feeling

· Students will be working with / reviewing these procedures each art class Through September

· Review/ Introduce 1pt. perspective- go over steps/ using rulers/ copying lines – Review ruler rules

· Have students create 2 houses step by step along with me on the board

· Introduce project(if time) possibly have students work on their Art Folders with the remaining art time- Students will be creating Surrealist Bedrooms

· Slide show: show the work of several surrealist artists- talk about how they were working- subject matter- highly detailed paintings, but things that didn’t fit together. Students will be creating their own surrealist bedroom using 1pt. perspective- then painting it using water colors (practicing painting procedures next week)

· DAY 2- 1st half: Review/ introduce procedures for Painting (watercolor procedures similar to tempera)- inform students that ALL students must MASTER procedures before any painting takes place

- Describe elements of the cart/ tools used

- Review jobs/ painting jobs never rotate to insure smooth transitions (jobs for set up/ clean up are the same

- Go over set up: part of “ready to work” in painting- students must have on smocks before class starts : practice set up (run through as many times as needed- use freeze/thaw as needed)

- Go over procedures during “working”

- Go over procedures during clean up- same students helping with clean up/ Practice clean up (run through as many times as it takes

· Demo: show students (review) how watercolors work (adding water to the watercolor pallets+ when mixing how to mix) – mixing colors is not required.

· Last half: Students may continue working on their Surrealist Bedrooms- review requirements

·

Resources (Materials/Texts/Visuals/Technology):

pencils, paper, rulers, painting cart, watercolors, brushes, art smocks, painting cart, TV, Computer, Digital Images

Misc:

“Surrealist Bedrooms”: Students will be creating drawings of their fantasy surrealist bedrooms using 1pt. perspective. All objects in the room must be created using 1 pt. There needs to be at least 8 objects in the room- ask students of things they would normally never see in a bedroom. Items should be in addition to a few regular items. These will be painted using watercolors. At least 5 colors need to be used. NO BLACK. Students do not need to mix the colors.

5th Grade- Charcoal Still Life Drawings (Value)


Lesson Plan for

Elementary Art

Teacher: Mr. Cooper-Davis Grade: 5th Quarter: Week:

Fine Art Standard(s)

25.A.2d

26.A.2e

Performance Descriptor(s)

Identify and describe the elements of 2- and 3-dimensional space, figure ground, value and form; the principles of rhythm, size, proportion and composition; and the expressive qualities of symbol and story.

Describe the relationships among media, tools/technology and processes.

Objectives:

· TLW demonstrate their prior art knowledge

· TLW recall the 3 types of Line

· TLW create 3 self portraits using the 3 types of line TLW explain what happens when light hits an object

· TLW show where shadows + darker areas should go on their shading worksheets

· TLW create still life charcoal drawing showing shadows

· TLW practice various basic art room procedures

· TLW demonstrate each art room procedure

· TLW recall the 3 art room rules

Formative Assessment

Summative Assessment

· Check students for participation + daily working attitude (points earned)- visual

Scoring Guide used in “Charcoal Still Life Drawings”

Student Learning Opportunities:

Strategies

Student Learning Activities

· Games/ group activities

· Pre-teaching

· Visuals

· Individual Experimentation/ Activities/ Projects

· Review Art Room Procedures : “Hand does the Talking”, “Freeze/Thaw” , “Ready to Work” feeling

· Students will be working with / reviewing these procedures each art class Through September

· Finish drawings: Creating 3 self portraits using the 3 types of line- each portrait can only use 1 type of line- add color when finished

· Intro to Light/ Value- Value= lightness or darkness of a color/ able to create more real illusions of objects by using shadow- show with trouble light + objects/ how shading occurs/ light moves around on the object- how to shade shapes to create the illusion of 3-D

· Shading Worksheet- Students should put the shadow on the correct side of the object- correct size/ how to shade each Shape (Step By Step for first 3)

· Intro to charcoal- not like a pencil/ somewhat messy- wiping hands on towels when finished- Demo: using finger (or paper towel piece) to blend shadows/ darker areas/ can be erased as well- don’t press hard or it will just break

· Review on contour drawing- drawing lines/ outside edges first- then inside edges/ followed by shading with charcoal- Students may start once they have finished the shading worksheets

Resources (Materials/Texts/Visuals/Technology):

pencils, crayons, colored pencils, markers, paper, charcoal, trouble light, sphere, box, cylinder, shading worksheets

Misc:

“Charcoal Still Life Drawings”: Students will need to first create contour drawings of their objects using charcoal. They must then create all of the shadows that they see+ shade them accordingly. Shadows should be created true to the light source.

4th Grade- Complimentary Geometric Shapes Painting (Tints & Shades)


Lesson Plan for

Elementary Art

Teacher: Mr. Cooper-Davis Grade: 4th Quarter: Week:

Fine Art Standard(s)

25.A.1d

26.A.1e

Performance Descriptor(s)

Identify the elements of line, shape, space, color and texture; the principles of repetition and pattern; and the expressive qualities of mood, emotion and pictorial representation.

Identify media and tools and how to use them in a safe and responsible manner when painting, drawing and constructing.

Objectives:

· TLW explain the color terms: primary, secondary, complimentary, neutral, color wheel

· TLW correctly execute all painting procedures

· TLW identify segments of the ruler

· TLW measure to the nearest inch, ½ inch, ¼ inch

· TLW create a painting using measurement, geometric shapes, contour lines, and alternating primary + secondary colors, tints + shades

· TLW practice various basic art room procedures

· TLW demonstrate each art room procedure

· TLW recall the 3 art room rules

Formative Assessment

Summative Assessment

· Check students for participation + daily working attitude (points earned)- visual

· Teaching Scoring Guide used in “Complimentary Geometric Shapes Painting”

Student Learning Opportunities:

Strategies

Student Learning Activities

· Games/ group activities

· Visual

· Individual Experimentation/ Activities/ Projects

· Review Procedures : “Hand does the Talking” /“Freeze/Thaw”/“Ready to Work” / “Clean Up”

Review Painting Procedures

· Intro rulers + measuring/ review segments of the ruler/ worksheets- measuring to he nearest ½ + ¼ inch

· Introduce Tints/ shades + Geometric Shapes painting: Students will be creating contour line drawings of the objects (make sure to overlap- concentrate on exterior contour lines (review contour lines)

· Demo creating tints/ shades

· When finished students must divide their paper exactly in half, then in quarters, then in eighths(diagonally)

· Begin painting (if time)- Students may begin mixing colors: use all mixed colors (primaries ok if tints or shades) use the lines as boarders/ paint should not cross them/ no same colors should touch

· Review Project Requirements (go over Scoring Guide)- entire paper needs to be used/ alternate colors (same colors should not touch)- need to use at least 6 colors- Tints + Shades+ Secondary colors

· Introduce Tints+Shades- again always adding darker color to lighter color (careful with black- very potent color) Demo: mixing tints/ shades

· Students set up/ begin painting

Resources (Materials/Texts/Visuals/Technology):

pencils, paper, paint, water, cups, brushes, drying rack, towels, smocks, oil pastels, geometric objects (still life objects etc.)

Misc:

“Complimentary Geometric Shapes Painting”: Students will be drawing from geometric objects. They will then be mixing the secondary colors, tints and shades. Colors should only touch complimentary colors (at the very least different colors) Students will be using rulers to divide paper into quarters and eights. The same colors should never touch